I have wanted chickens for 20 years but never had a real opportunity until my husband and I built our empty nest home in a rural Michigan wooded area two years ago. Our winters are long and cold, summers are warm and humid with no shortage of deer ticks and biting flies. The coop location is east facing about 100 ft from my house, sitting atop a high bluff overlooking low wetlands and grass fields to the south and forest land to the north and west. It is breezy on the bluff most days with a prevailing NW wind and winter brings cold NW snow squalls from Canada across Lk Superior. The predator load in my area is quite high with coyote, wolf and bobcat being the most prevalent on the ground and eagle from the sky. My coop design has changed many times with predator and winter proofing taking top priority while keeping cost under control.
I was able to source a one piece 6x10 fiberglass building that was being scrapped by a local utility. The building is solid, very heavy and completely weatherproof. The building has 1 inch foam insulation sandwiched between two fiberglass layers, electric conduit, fuse box (yes, fuses) and a thermostat controlled exhaust fan which sadly no longer worked. The existing roof has a modest pitch with a small 2 inch overhang that would not shed snow and rain adequately for use as a chicken coop so we needed a plan for a new roof. The whole unit sat on top of a treated lumber deck which was still in good shape. We re-bolted the unit to the deck for peace of mind.
The first order of business was to strip the interior of unwanted material and add ventilation adequate for a maximum of 12- 15 large breed birds. I bought and laid a discontinued lovely 90s style vinyl floor that was substantially discounted on top of the existing fiberglass (FG) floor and secured it with a pneumatic stapler.

With DH in charge of all saws he cut a total of 12 sq ft into the ceiling, retaining the tidge for structural integrity. I added 1/2 inch hardware cloth (HC) then we laid out rafters for a second roof to sit on top of the FB roof, added18 inch overhangs and covered with metal roofing panels left over from our home and garage projects.

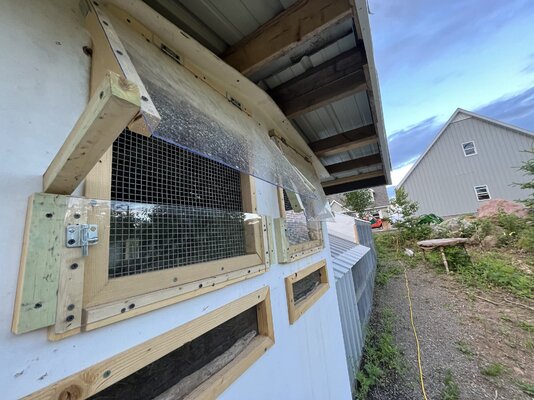
I cut (uneven) windows holes, pop door, and roost level viewing windows, secured with HC, and eventually DH framed with 1x2. Window casings had to be made to fit to protect the exposed 1 inch fiberglass insulation from the elements (and to hide my wonky cuts. As DH took over all saw duties, I set to work on securing acrylic windows, HC and 1x1 to cover the edges (precut by DH, of course).
The main windows face south as do the roosts. As chickens sit on the roost they get an eye level view to the outside. I cut the main windows too long because I apparently can’t read a tape measure, so I added permanent acrylic to the bottom 8 inches, which put the breeze well above the chicken’s heads. Flip style windows blocks in two sizes were attached to the outside frame to allow me to adjust the window pitch when open with the shortest leaving about a 4 in gap. That is enough to allow air flow in summer but prevent rain blowing in when we get the occasional southern storm front. Barrel locks were added for closing windows completely in winter. The upper window portion overlaps the bottom slightly but it sits rather flush and is protected by the roof overhang.
The west facing window is a porthole where the original exhaust fan was removed. DH made a simple sliding window with a wood block handle. A block of wood secured to the building acts as a stop to prevent northwest wind from taking the window out completely.
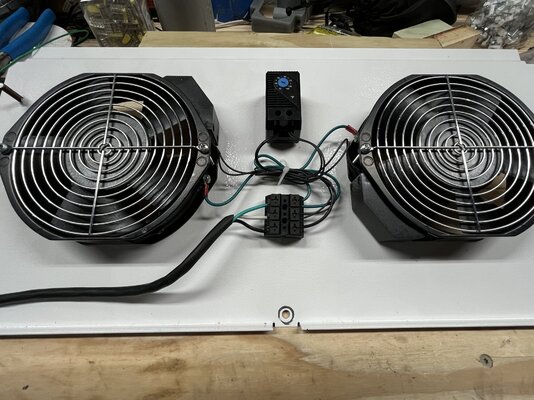
I plan to install this exhaust fan to the coop ceiling to draft air up as it’s stuffy during the unusual heat wave we’re having. It is thermostatically controlled. It weighs 5 lbs so I will add supports for safety.
Moving the coop made me nervous for DHs safety, but he assured me I was just paranoid.
DH leveled a block foundation and moved the coop in place. We laid a 2 ft predator apron and backfilled with gravel. I graded the gravel away from the coop (and eventually the run) to help with drainage.
Chicks are 5 weeks old, babes in the woods, huddled on a small dirt patch.
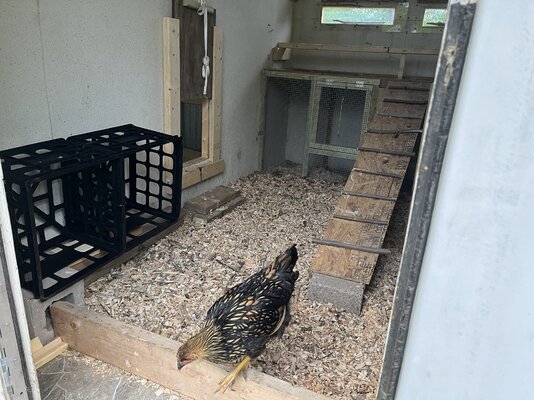
We built poop boards and covered the base with the stylish 90s vinyl and added roost bars. The longest poop board is 6 ft and the side p-board is 3.5 ft long, sitting 34 inches from bare floor and 8 inches below the underside of the roosts.
Under the largest p-board we made a 2x6 ft chick enclosure with removable panels and a lift up door. I have 1 wk olds now that will be going in the enclosure by 4 weeks. I plan to make a separate pop door to the left for access to the run, and a temporary fence partition in the run for chick integration.
The space under the shorter p-board will be multipurpose as needed: ChicU, broody jail, or just a little private hidey-hole for shy birds. The pop door is a simple lift style. It remains open 24/7 and leads to a secure covered run.
I will have 3 nest boxes using sturdy 14x16 plastic crates. My birds are not quite 12 weeks old as of this writing so nest boxes is my next priority. I had DH cut board panels for the floor and dividers which I will install soon.
Meanwhile…DH was building the run. The property slopes toward the coop but with good drainage and a fiberglass building we made it work. The run is 8x24 and built in two heights 5.5 ft closest to the coop to accommodate the coop roof overhand, and 6 ft farthest to allow us to stand up. DH sunk 4x6 posts every 6 feet for main supports and leveled the tops, made rafters and added 2x4 purline for HC attachment.
The run is completely covered with metal roofing panels. I took advice from BYC members and added overhang to the run roof as there was some water running down the HC. I also added 4 ft metal panels to the sides nearest the coop for feed station weather protection. There is a 2 ft HC predator apron around the run, covered with driveway gravel then graded out another 2 ft for added water drainage.
Above is the ever friendly Nuggets, a bielefelder pullet, guarding my tool belt during lunch break.
To the run I added several roosts, a few hollow logs and a chair, which they claimed via cecal poop.
The floor is chipped pine and dry poplar from my property, same as in the coop.
I screwed all the roosts to something secure after a branch fell and caused all kinds of pullet drama.
To the right of the waterer is an escape portal for entering the run from the side when free ranging. The portal and people door at the far end stays open when I’m around to watch. I have a 3 wire electric fence enclosing about 2500 sq ft for free ranging, but no raptor protection other than small trees, shrubs and a few pallets and a table. I rarely see hawks up on the bluff, but eagles are a concern.
I took so much advice and knowledge from so influential BYC members that the details may be well recognized by their respective owners.
Special thanks to @aart, @3KillerBs, @azygous and @DobieLover for their expert advice and articles from which I gleaned so much.
Meet a few of the gang
Karen the Karen.
Stewie blocking the ladies (Hedwig and Big momma) from exiting too close to dusk.
Buckbeak