The "Red Barn" Coop.
______________________________

This is the first coop I have ever built. It is sturdy and houses my flock well. Enjoy this coop-page article on The "Red Barn" Coop!
How did you build this coop?
Well folks, I actually started from scratch. I was going to do the walls one way, but then figured out the coop would be too heavy if I did it that way.....so I used that first "wall" I built as the floor for my coop. Then I went from there.... building, buying, looking things up, then putting it together! I'm not going to give much detail here because all this stuff will be explained throughout the article.")
Tip: If you want to build this coop you will most likely need to put it up on stilts like I did because I don't think it was designed to sit of the ground....but maybe if you made some adjustments you could have it sit on the ground.
Details on how it was placed:
1. I put this coop in a spot where water would run away from it when it rained, as I didn't want lots of puddling in the run. But the chickens have since changed that.
2. A good thing about the coop being raised off the ground is that the girls can stay cool in summer by going under in the shade. They also can get out of the rain without always going inside the coop.
3. I've heard raising the coop also keeps snakes out, but I have never had a problem with snakes because I don't any large species around my place.
___________________________
Next up, plans for my coop and run. And yep! I have them.

These are roughly the plans for The "Red Barn" Coop ^. Feel free to look them over and use them!
________________
These are pictures of the coop as it was being constructed! Sadly I can't find the ones from earlier on.
Being painted:
Almost finished painting + chicken door is cut out.

Ventilation wire and perches being put in.
These are the girls when they were young pullets exploring their new home. (Sadly Kiwi, one of the Buff Orpington's has since passed on.)
Out in the run:
__________________________
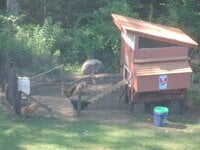
This is the coop soon after it was finished.
More pictures of the coop:
\
This is an inside view of the nesting boxes.

An outside view of the nesting boxes.
The girls photo bombing as I take pictures of the inside of the coop. (NOTE: This is before I cleaned out the coop. )
)
Things I want to change or add:
1. I want a better locking system. Right now I just slide the door shut at night and put a piece of wood so it can't open.
2. There are a few cracks near the nesting boxes where rain can get in if there is a big storm. I want to do something about that so I don't have wet wood shavings.
3. I want to add a clean out door.
I can't think of anything else I want to change or add right now. I guess I did pretty good! ")
Other things I want to share:
- I am doing the deep litter method right now, it's the easiest way I've heard of and it's working great!
- I wish I would have made the stilts a little sturdier when I first built the coop because the girls like to dig around them so I'm using bricks and gravel to keep them from going any further at the moment.
- I have ventilation covers that fit on the big triangle shaped vents so when it rains really hard and is windy I can block up one of the vents so the inside of the coop doesn't get wet along with the chickens.
Upgrades:
- I have since added another perch because my girls GREW! Lol (So now I have two perches in this coop.)
- I recently added a gate to the run so I can access it much easier now!

- I also made the run bigger by putting in more fence and then cutting a hole in the existing run. They love it!

I have found out I really enjoy keeping chickens as pets. I always tell myself, "Eggs are just a bonus!". They are a joy to have around! I am currently keeping 8.
Well, I've introduced you to my coop and how I built it, so why not introduce you to my girls?
I have 3 Golden Laced Wyandotte hens named Melody, Dazzle, & Blamo.
Next, I have 2 Buff Orpington hens named CreamPuff and Marshy. (I used to have 3 but Kiwi has since passed away.)
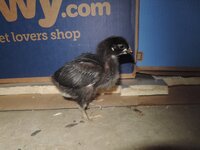
I'm also brooding chicks in my basement! They are so cute, and I love having them around also. They are about 3 and a half weeks old. Their names are:
Penguin - (Most likely Blue Austrolorp or Sapphire Gem)
Mipsy - (Most likely Black Sex-Link)
Pippy - (Most likely Black Sex-Link)
(These picture were taken about 1 week apart so they look different ages but really aren't.)
I hope you enjoyed this article on The "Red Barn" Coop.
Thank you for reading!
- Clucky
______________________________
This is the first coop I have ever built. It is sturdy and houses my flock well. Enjoy this coop-page article on The "Red Barn" Coop!
How did you build this coop?
Well folks, I actually started from scratch. I was going to do the walls one way, but then figured out the coop would be too heavy if I did it that way.....so I used that first "wall" I built as the floor for my coop. Then I went from there.... building, buying, looking things up, then putting it together! I'm not going to give much detail here because all this stuff will be explained throughout the article.
Tip: If you want to build this coop you will most likely need to put it up on stilts like I did because I don't think it was designed to sit of the ground....but maybe if you made some adjustments you could have it sit on the ground.
Details on how it was placed:
1. I put this coop in a spot where water would run away from it when it rained, as I didn't want lots of puddling in the run. But the chickens have since changed that.
2. A good thing about the coop being raised off the ground is that the girls can stay cool in summer by going under in the shade. They also can get out of the rain without always going inside the coop.
3. I've heard raising the coop also keeps snakes out, but I have never had a problem with snakes because I don't any large species around my place.
___________________________
Next up, plans for my coop and run. And yep! I have them.
These are roughly the plans for The "Red Barn" Coop ^. Feel free to look them over and use them!
________________
These are pictures of the coop as it was being constructed! Sadly I can't find the ones from earlier on.
Being painted:
Almost finished painting + chicken door is cut out.
Ventilation wire and perches being put in.
These are the girls when they were young pullets exploring their new home. (Sadly Kiwi, one of the Buff Orpington's has since passed on.)
Out in the run:
__________________________
This is the coop soon after it was finished.
More pictures of the coop:
This is an inside view of the nesting boxes.
An outside view of the nesting boxes.
The girls photo bombing as I take pictures of the inside of the coop. (NOTE: This is before I cleaned out the coop.
)
Things I want to change or add:
1. I want a better locking system. Right now I just slide the door shut at night and put a piece of wood so it can't open.
2. There are a few cracks near the nesting boxes where rain can get in if there is a big storm. I want to do something about that so I don't have wet wood shavings.
3. I want to add a clean out door.
I can't think of anything else I want to change or add right now.
I guess I did pretty good! Other things I want to share:
- I am doing the deep litter method right now, it's the easiest way I've heard of and it's working great!
- I wish I would have made the stilts a little sturdier when I first built the coop because the girls like to dig around them so I'm using bricks and gravel to keep them from going any further at the moment.
- I have ventilation covers that fit on the big triangle shaped vents so when it rains really hard and is windy I can block up one of the vents so the inside of the coop doesn't get wet along with the chickens.
Upgrades:
- I have since added another perch because my girls GREW! Lol (So now I have two perches in this coop.)
- I recently added a gate to the run so I can access it much easier now!
- I also made the run bigger by putting in more fence and then cutting a hole in the existing run. They love it!
I have found out I really enjoy keeping chickens as pets. I always tell myself, "Eggs are just a bonus!". They are a joy to have around! I am currently keeping 8.
Well, I've introduced you to my coop and how I built it, so why not introduce you to my girls?
I have 3 Golden Laced Wyandotte hens named Melody, Dazzle, & Blamo.
Next, I have 2 Buff Orpington hens named CreamPuff and Marshy. (I used to have 3 but Kiwi has since passed away.)
I'm also brooding chicks in my basement! They are so cute, and I love having them around also. They are about 3 and a half weeks old. Their names are:
Penguin - (Most likely Blue Austrolorp or Sapphire Gem)
Mipsy - (Most likely Black Sex-Link)
Pippy - (Most likely Black Sex-Link)
(These picture were taken about 1 week apart so they look different ages but really aren't.)
I hope you enjoyed this article on The "Red Barn" Coop.
Thank you for reading!
- Clucky


 . It's amazing